Introduction
In this tutorial, we will look at how to install Nginx web server on Rocky Linux using 6 easy steps. Just like Apache web server, Nginx is another highly demanded and used web server. It is reliable and provide security to your web applications. It has wide usage in the industries which we will cover in the upcoming sections of this tutorial.
![How to Install Nginx Web Server on Rocky Linux: [7 Easy Steps]](https://www.linuxnasa.com/wp-content/uploads/2023/09/nginx-linux.jpg)
Nginx Overview
Nginx is a high-performance , open-source web server software. It’s known for its speed, scalability and efficiency in handling concurrent connections. Nginx is widely used in various industries for several purposes. Some of the usage of Nginx is listed below.
Web Hosting: Nginx is used for hosting websites and web applications. It can serve both static and dynamic content efficiently, making it suitable for hosting various types of websites.
Reverse Proxy: Nginx is often used as a reverse proxy server that sits in front of other web servers such as Apache or application servers like Node.js or Python-based servers. It handles incoming client requests, distributes them to the appropriate backend servers and forwards responses back to clients.
Load Balancing: Nginx excels at load balancing incoming traffic across multiple backend servers. It ensures even distribution of requests, enhances fault tolerance and optimizes resource utilization.
SSL/TLS Termination: Nginx can terminate SSL/TLS encryption, offloading the encryption/decryption process from backend servers. This reduces the computational load on application servers and improves overall performance.
API Gateway: Many organizations use Nginx as an API gateway to manage and secure access to their APIs. It can handle authentication, rate limiting and request routing for APIs.
Docker and Kubernetes Integration: Nginx is commonly used in containerized environments like Docker and Kubernetes to handle routing and load balancing for containerized applications.
Nginx Alternative Solutions
Also read: How to Find Wi-Fi Password in Windows: [2 Easy Methods]
There are many alternative Web Server solutions available for use based on use cases of your application. some of them are:
Apache: Apache is an open-source web server . It is widely used as it serves web content, handle incoming web server request and deliver web pages to user’s browsers.
Caddy: Caddy is a modern, easy-to-configure web server with automatic HTTPS support. It’s designed to be user-friendly and includes features like automatic SSL certificate generation.
Tomcat: Apache Tomcat is a Java-based web server and servlet container. It’s primarily used for hosting Java web applications and is often paired with Apache of Nginx as a reverse proxy.
LiteSpeed: LiteSpeed is a commercial web server that offers high performance and efficiency. It’s known for its ability to server dynamic content efficiency and for its LiteSpeed Cache solution.
CPanel(WHM): cPanel and WebHost Manager (WHM) are web hosting control panel software that includes Apache or Nginx as part of its stack. They simplify website management for hosting providers.
How to Install Nginx Web Server on Rocky Linux: [7 Easy Steps]
In this tutorial, we will focus on installing the Nginx web server package on Rocky Linux/CentOS 8 Linux distribution system. The installation steps may vary on different Linux distribution.
Also read: How to Install Kali Linux 2023.3 on VirtualBox: [7 Simple Steps]
Prerequisite
- Rocky Linux/CentOS 8 Operating System Installed.
- Root privilege access.
- Basic understanding of Linux CLI commands.
Step-1: Check OS Version
In this step, check which Linux distribution and version is installed using below command.
[root@linuxnasa ~]# cat /etc/os-release
NAME="Rocky Linux"
VERSION="8.8 (Green Obsidian)"
ID="rocky"
ID_LIKE="rhel centos fedora"
VERSION_ID="8.8"
PRETTY_NAME="Rocky Linux 8.8 (Green Obsidian)"
ANSI_COLOR="0;32"
CPE_NAME="cpe:/o:rocky:rocky:8:GA"
HOME_URL="https://rockylinux.org/"
BUG_REPORT_URL="https://bugs.rockylinux.org/"

CENTOS_MANTISBT_PROJECT="Rocky-Linux-8"
CENTOS_MANTISBT_PROJECT_VERSION="8.8"
REDHAT_SUPPORT_PRODUCT="Rocky Linux"
REDHAT_SUPPORT_PRODUCT_VERSION="8.8"
Step-2: Update dnf Repository
In this step, update the dnf repository using below commands so that it fetches latest version of all the packages for installation.
[root@linuxnasa ~]# dnf -y update
Step-3: Install Nginx Package
In this step, install the Nginx package using dnf package manager using below command. This command will install Nginx along with all dependent packages.
[root@linuxnasa ~]# dnf install -y nginx
Step-4: Verify Installed Nginx Package
In this step, verify if the Nginx package is successfully installed in your system using below command. If you get the list of all the nginx packages in the output that means it is successfully installed.
[root@linuxnasa ~]# rpm -qa | grep nginx

nginx-1.14.1-9.module+e18.4.0+542+81547229.x86_64
nginx-mod-http-xslt-filter-1.14.1-9.module+e18.4.0+542+81547229.x86_64
nginx-filesystem-1.14.1-9.module+e18.4.0+542+81547229.noarch
nginx-all-modules-1.14.1-9.module+e18.4.0+542+81547229.noarch
nginx-mod-stream-1.14.1-9.module+e18.4.0+542+81547229.x86_64
nginx-mod-http-per1-1.14.1-9.module+e18.4.0+542+81547229.x86_64
nginx-mod-http-image-filter-1.14.1-9.module+e18.4.0+542+81547229.x86_64
nginx-mod-mail-1.14.1-9.module+e18.4.0+542+81547229.x86_64
Step-5: Configure Firewall Rule for Nginx
In this step, in order to allow connections to Nginx web server, configure firewall rule for Nginx service as shown below.
//Configure HTTP port(80)
[root@linuxnasa ~]# firewall-cmd --permanent --zone=public --add-service=http
success

//Reload to make rule persistent
[root@linuxnasa ~]# firewall-cmd --reload
success
Step-6: Enable Nginx Service
In this step, enable the Nginx service using systemctl utility as shown below.
//To start Nginx service
[root@linuxnasa ~]# systemctl start nginx

//To enable Nginx service
[root@linuxnasa ~]# systemctl enable nginx
Created symlink from /etc/systemd/system/multi-user.target.wants/nginx.service to /usr/lib/systemd/system/nginx.service.

//To check current status og Nginx service
[root@linuxnasa ~]# systemctl status nginx
● nginx.service - The nginx HTTP and reverse proxy server
Loaded: loaded (/usr/lib/systemd/system/nginx.service; enabled; vendor preset: disabled)
Active: active (running) since Fri 2023-09-15 01:33:04 IST; 18s ago
Main PID: 1362544 (nginx)
Tasks: 3
Memory: 2.0M
CGroup: /system.slice/nginx.service
├─1362544 nginx: master process /usr/sbin/nginx
├─1362545 nginx: worker process
└─1362546 nginx: worker process

Sep 15 01:33:04 linuxnasa systemd[1]: Starting The nginx HTTP and reverse proxy server...
Sep 15 01:33:04 linuxnasa nginx[1362539]: nginx: the configuration file /etc/nginx/nginx.conf syntax is ok
Sep 15 01:33:04 linuxnasa nginx[1362539]: nginx: configuration file /etc/nginx/nginx.conf test is successful
Sep 15 01:33:04 linuxnasa systemd[1]: Started The nginx HTTP and reverse proxy server.
Step-7: Test Nginx Setup
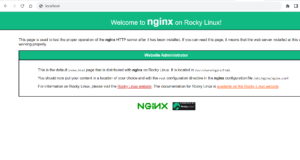
In this step, open your browser and type ‘localhost’ or system’s eth0 IP to access the Nginx home page. If you see below output that means Nginx is installed and configured successfully in your system.

Summary
We have successfully installed the Nginx web server package on Rocky Linux/CentOS 8 system. If you are using different distribution of Linux and want to install this package, you can follow the Nginx official documentation nginx.org for installation steps.
