In this tutorial, we will learn about how to troubleshoot and fix the Python error ModuleNotFoundError No module named requests. This is mostly occurs when the requests module is not recognized or found in the cureent folder where you are building your application. In Python, requests is a module which is used to perform HTTP GET call to an API. We will look at some of the common mistakes done by a developer which can lead to this error. So, let us get started.
ModuleNotFoundError No module named requests
Also Read: How to Install python-socketio Stable Diffusion [5 Easy Steps]
There could be multiple possible reason because of which we get the requests module not found error. For example, if python interpreter is not found in the current folder or if requests module is not installed before using it the the application. These all will result in an error reporting the requests nodule is not found. Let us look at few ways to resolve this error.
Prerequisite
- Windows/Linux Operating System Installed
- Pipenv Installed
- VS Code IDE Installed
1. Check If Python is installed
The module requests is a Python module so it is important that you have installed and configured the Python in your system. To check if Python is installed or not, execute below command. If you get the output similar to below, it means Python is installed.
> python --versionPython
2. Check if requests Module is installed
In this method, switch to the folder where you are developing your Python application. Next, using below command check if requests module is installed. The command pipenv graph will display currently installed dependency graph information. The command after pipe (|) Select-String "requests" will fetch the string “requests” from previous command output and display on the console if it finds any. If no output is returned, it means requests module is not installed.
> pipenv graph | Select-String "requests"
NOTE:
If requests module is not installed, you can install the requests module using below command.
> pipenv install requests
3. Check If Virtual Environment is activated
When a Python application is developed, it is a common and strongly recommended approach to create a virtual environment for the current folder where development will take place. This makes sure all the modules installed as application dependency is restricted to the created virtual environment and does not install the modules globally in the system. Therefore before executing your application make sure virtual environment is activated. To do so, execute below command.
> pipenv shell
4. Check if the right interpreter is selected.
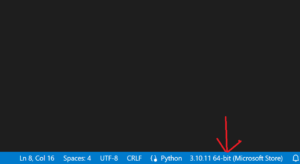
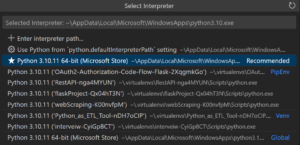
Another possible reason could be that the Python interpreter is not pointing to your current project directory. You can set the interpreter to point to the current project directory by clicking on the interpreter option which is present at the bottom right of the VS Code IDE as shown below.

Next, select the current project from the drop down. You have to select the current working path . Once selected, hit enter key and then save the python file. This will resolve the module not found error for current folder.

Summary
We have fixed the requests modulenotfounderror using one of the solution provided in this tutorial. You can learn more about requests module usage from here.
